Website Script
This guide walks you through installing the Dreamdata JavaScript script on your website. The script is unique to your Dreamdata account and enables comprehensive tracking of website traffic, user behavior, and form submissions.
Prerequisites
Before you begin, ensure you have:
- Access to your Dreamdata account
- Administrative access to your website's HTML code or Google Tag Manager
- (Optional) Access to your Consent Management Platform if you use one
Step 1: Locate Your JavaScript Script
- Log in to your Dreamdata account
- Navigate to Data Platform > Sources > JavaScript v2.0
- Your unique tracking script will be displayed here
Step 2: Install the Script
In Data Platform > Sources > JavaScript v2.0, select your preferred method to add the script to your website.
Option A: Install Manually on Website
1. Install the Script
Copy the JavaScript script and paste it within the <head> section of your
website's HTML, before the closing </head> tag.
<head>
  <!-- Other head elements -->

  <!-- Dreamdata Analytics Script -->
  // Your Dreamdata script goes here
</head>
2. Save and deploy your changes
3. Configure Consent Management (Optional)
If your site uses a cookie consent banner, load the Dreamdata script according to your visitors' consent choices. Follow your Consent Management Platform's documentation:
- Cookieless script (if used): always load it, regardless of consent.
- Standard script: load it only when consent is granted.
Option B: Install with Google Tag Manager
1. Access Google Tag Manager
- Log in to your Google Tag Manager account
- Select the GTM container that is installed on the website you want to track
2. Create a Custom HTML Tag
- Click Tags in the left sidebar
- Click New to create a new tag
- Choose Custom HTML as the tag type
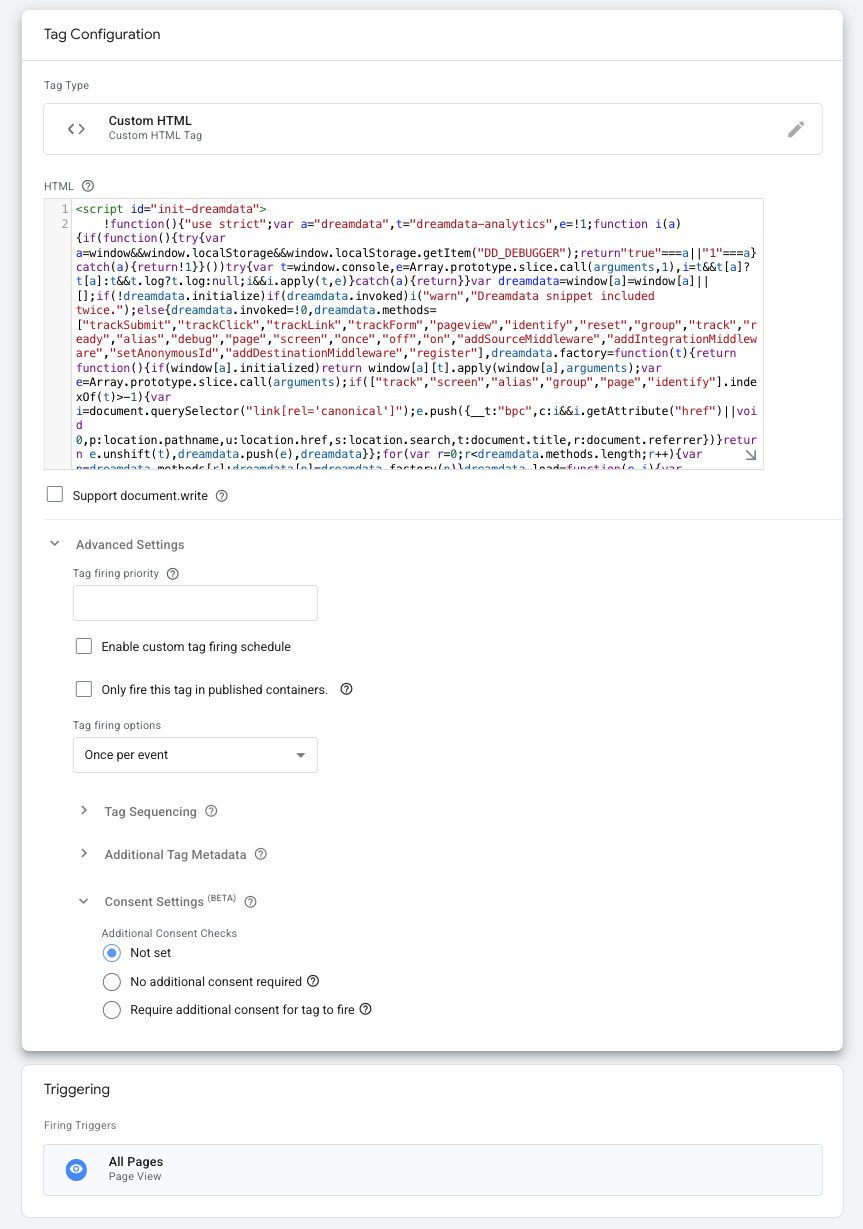
3. Configure the Tag
- Paste your Dreamdata JavaScript script into the HTML field
- Name your tag (e.g., "Dreamdata Analytics")
4. Set Up Triggering
- Click Triggering and select All Pages
- This ensures the script loads on every page of your website
5. Save and Publish
- Ensure that under Consent Setting and under Additional Consent Checks you have selected Not Set. This is essential to avoid conflicts that can prevent your script from firing. See the bottom of the below screenshot to see what these settings will look like in GTM.
- Save your tag configuration
- Submit and publish your changes in GTM
Important: Test your setup after deployment to confirm tracking behaves correctly when users accept and reject cookies.
6. Enable Google Consent Mode v2 (Optional)
If you use a Consent Management Platform (CMP), you must ensure Google Consent Mode v2 is properly configured. This allows for compliant tracking based on user consent preferences. Learn more about What is Google Consent Mode v2.
Follow the setup documentation for your specific CMP to enable Google Consent Mode:
- CookieBot - Google Consent Mode implementation
- CookieYes - Consent Mode with CookieYes
- OneTrust - Google Consent Mode v2 setup
- Osano - Consent Mode v2 configuration
- HubSpot - Google Consent Mode v2 setup
- Cookie Information now supports Google Consent Mode v2 by default. However, if you have an older implementation of the banner you can follow this guide to enable it.
- Framer cookie banner is compliant with Google Consent Mode v2 by default.
- Klaro - Google Consent Mode v2 setup
If your Cookie Management Platform is not included in this list, you can search for it online to find instructions on enabling Google Consent Mode v2.
Step 3: Verify Your Installation
After installing the script, verify that Dreamdata Analytics is working correctly using:
- Browser Developer Tools - Check network requests and script loading
- Dreamdata App Debugger - View real-time events in your Dreamdata account
For detailed verification instructions, see our debugging guide.
Troubleshooting Common Issues
Script Not Loading
- Verify the script is properly placed in the
<head>section - Check for JavaScript errors in the browser console
- Ensure your website's Content Security Policy allows the script
No Data in Dreamdata
- Confirm your writeKey matches the one in your Dreamdata account
- Check that the script is firing on page load
GTM Issues
- Ensure the GTM container is published
- Check that the "All Pages" trigger is properly configured
- Verify there are no tag conflicts in GTM
Need Help? If you encounter issues during installation, contact our support team or consult the FAQ section for additional guidance.